


How to Start Linocut & Block Printing for DIY Projects
Block printing is one of the most creative and satisfying printmaking techniques. With just a few tools, you can create beautiful handmade prints on paper, fabric, cards, gift bags, and many other DIY projects.
In this beginner-friendly tutorial, we’ll walk through the basic steps of block printing using the Speedball Deluxe Block Printing Kit, a complete starter kit that includes most of the tools you need to begin carving and printing.
What Is Block Printing?
Block printing is a printmaking technique where a design is carved into a block made of linoleum or rubber. Ink is then rolled onto the surface of the block and transferred onto paper or fabric to create a print.
This technique is widely used for:
- art prints
- handmade greeting cards
- wrapping paper
- textile printing
- DIY crafts and patterns
The carved block can be reused many times to create repeated prints or patterns.
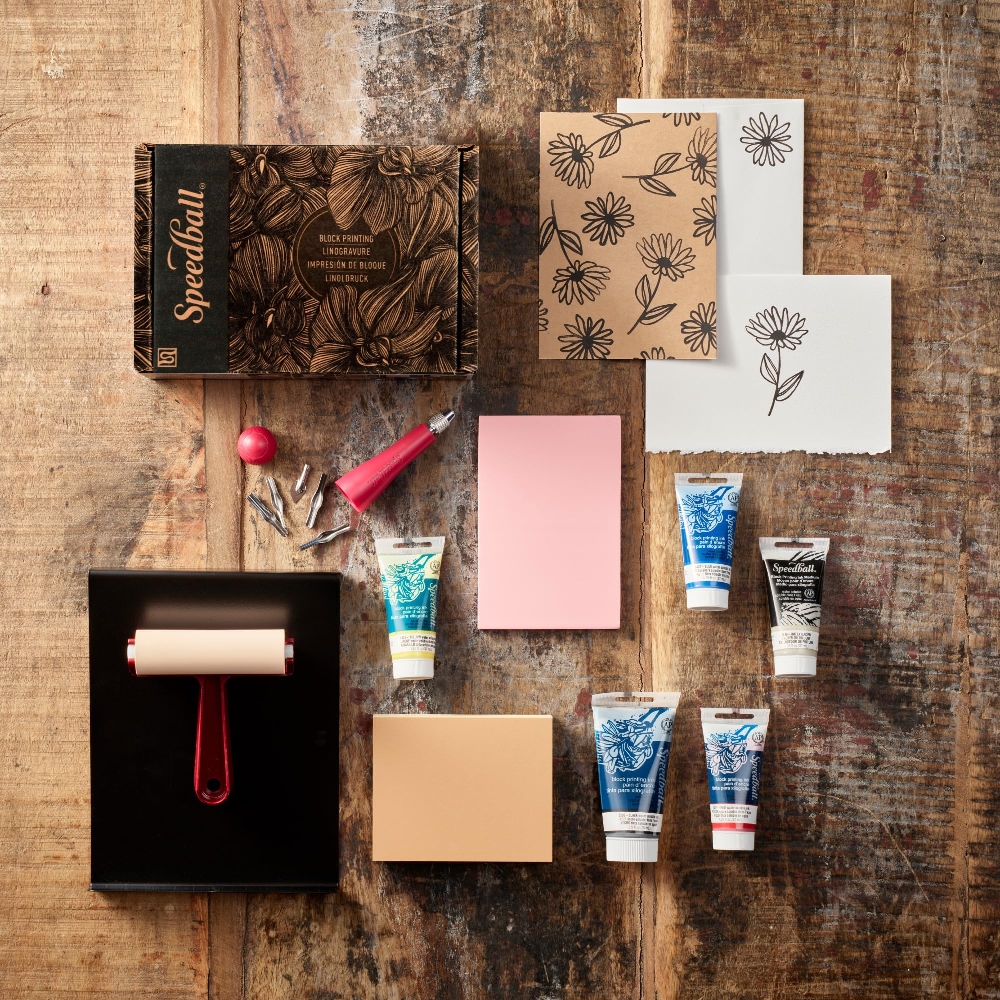
What’s Inside the Speedball Deluxe Block Printing Kit
This kit is ideal for beginners because it includes most of the essential tools needed to start block printing.
Inside the kit you will find:
- Water-soluble block printing inks:
- Black 74ml
- Red 37ml
- Yellow 37ml
- Blue 37ml
- Ink extender: 37ml
- Soft rubber brayer: 10cm
- Inking plate
- Ergonomic carving handle with blade storage
- 4 carving blades: #1, #2, #5, #6
- Linoleum block: 10 × 12.5 cm
- Speedy-Carve block: 10 × 15 cm
- Instruction book (English)
With these materials you can start carving and printing right away.
Additional Materials You May Need
Most of the tools are included in the kit. You may also want to have:
- cardstock or printing paper
- pencil
- sketch paper or printed design
- tracing paper (optional)
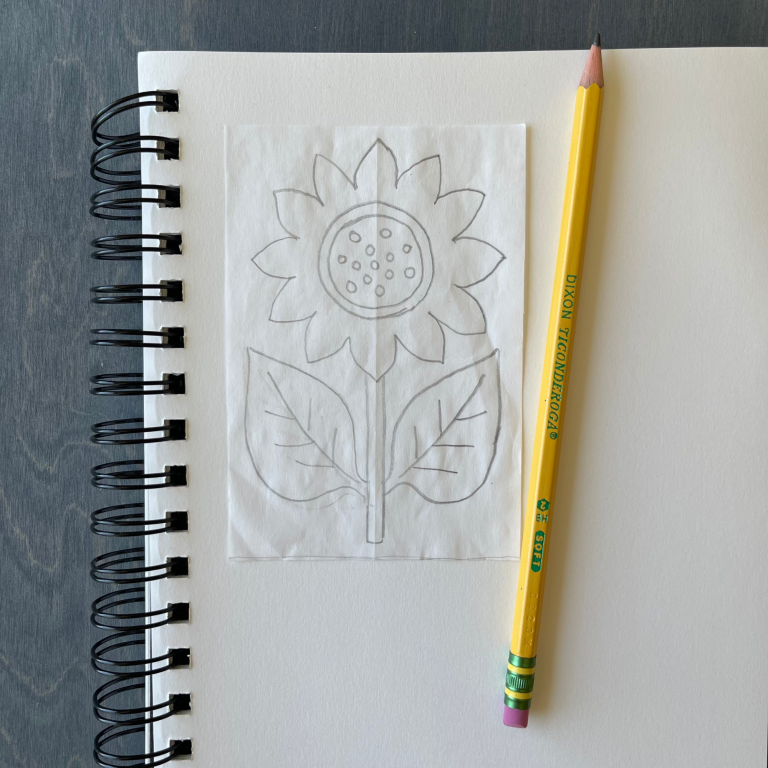
Step 1: Choose or Create Your Design
Your design can be:
- a hand-drawn sketch
- a vector design
- an illustration you found online
- a simple pattern
If you are new to block printing, start with simple shapes such as:
- leaves
- flowers
- geometric shapes
- animal silhouettes
Simple designs are easier to carve and usually produce cleaner prints.
 the friendly printmaker
Step 2: Transfer Your Design to the Block
There are several easy ways to transfer your design onto the carving block.
Pencil Transfer Method
- Draw your design on paper.
- Turn the paper over.
- Shade the back of the drawing with a pencil.
- Place the paper on the block and trace the design again.
The graphite will transfer the design onto the block surface.
Tracing Paper Method
You can also place tracing paper between the design and the block and trace the image with a pencil.
💡 Important tip
Remember that the final print will appear mirrored, so keep this in mind especially if your design includes text.
![]() the friendly printmaker
the friendly printmaker
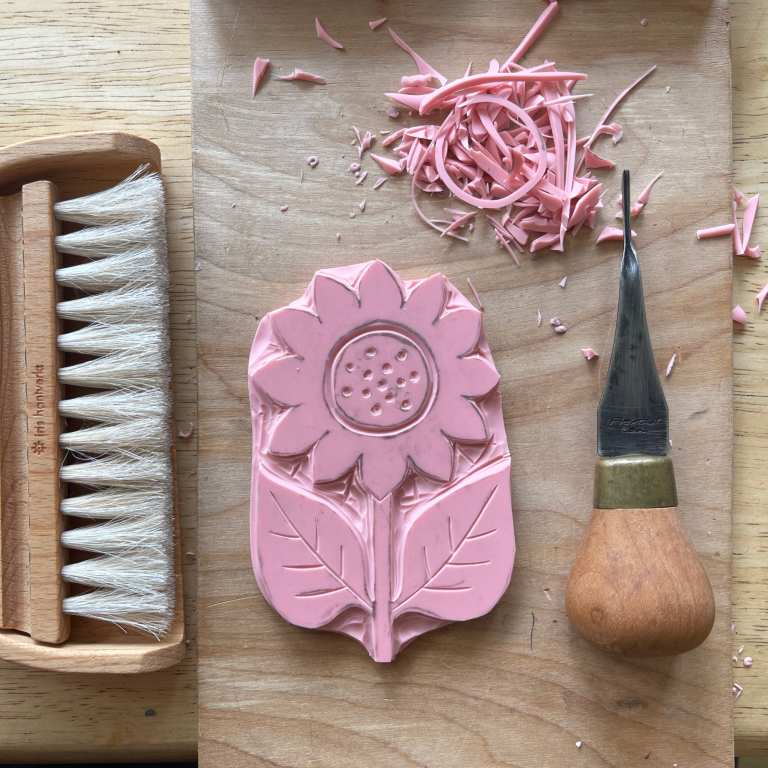
Step 3: Carving the Block
The kit includes several carving blades, each designed for different types of cuts.
During carving you will usually switch between multiple blades depending on the area you want to remove.
Common carving blades
#1 Small V-gouge
for very fine lines and small details
#2 Large V-gouge
for outlines and slightly wider lines
#3 Small U-gouge
for carving small areas
#5 Large U-gouge
for removing larger sections of the block
#6 Knife blade
for sharper cuts and clean edges
A good approach is to carve the fine details first and then remove larger areas.
💡 Remember
Anything you carve away will not print.
 the friendly printmaker
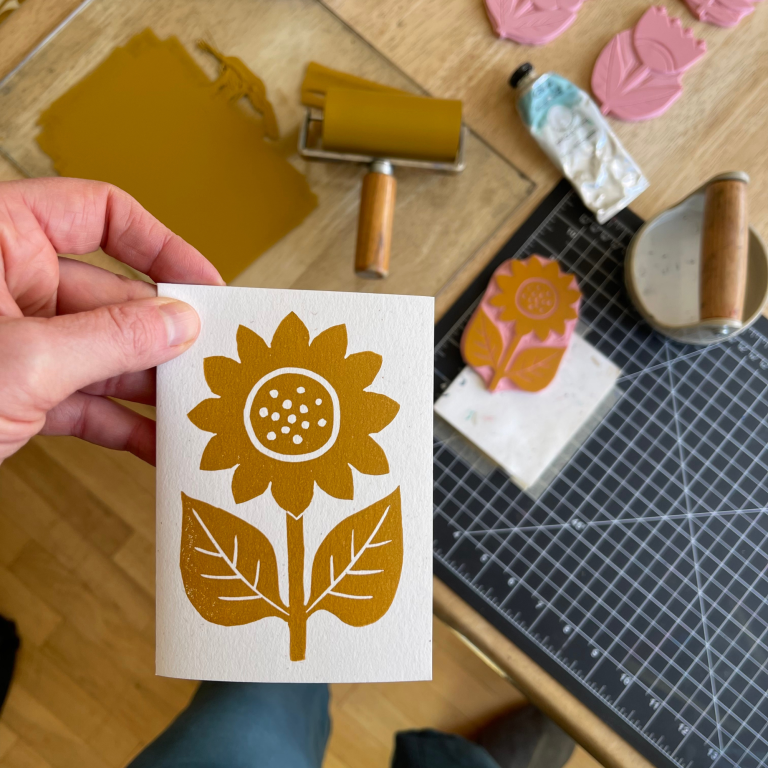
Step 4: Preparing the Ink
Place a small amount of ink on the bench hook or on a smooth surface.
Roll the brayer through the ink until it spreads evenly on the roller. Then roll the ink onto the carved block.
You want an even, thin layer of ink across the raised areas of the block.
Step 5: Choosing the Right Ink
The type of ink you use depends on the surface you want to print on.
Ideal for:
- art prints
- greeting cards
- tags
- posters
- paper crafts
Best for:
- fabric gift bags
- tote bags
- placemats
- textile projects
Using different inks allows you to use the same carved block for many types of DIY projects.
Step 6: Printing Your Design
Place the inked block on your paper or fabric and press firmly.
Then carefully lift the block to reveal your print.
You can repeat the process multiple times to create repeating patterns or multiple prints.
 the friendly printmaker
DIY Ideas Using Block Printing
Once you create your first block, you can use it for many different projects:
- handmade greeting cards
- gift tags
- wrapping paper
- art prints
- fabric gift bags
- placemats
- textile decorations
Block printing is a versatile technique that allows you to create beautiful handmade items with a personal touch.
Ready to try block printing yourself?
The Speedball Deluxe Block Printing Kit includes most of the essential tools you need to start carving and printing your own designs on paper or fabric.
Explore the kit in our shop and start your first printmaking project today.


